When we were young, this was always the time of year that the craft supplies were brought out nearly every day, as we made homemade decorations for Thanksgiving dinner, created new ornaments for the Christmas tree (which seemed much cuter 20 years ago!), and worked on homemade Christmas presents for all of the relatives.
We’re excited to continue this tradition with our own children, and we all went to work in earnest this year helping our children create ornaments for the cover of our Christmas catalog. If you’re looking for some fun homemade Christmas ornament projects to enjoy with your own children, read on for some of our favorites!
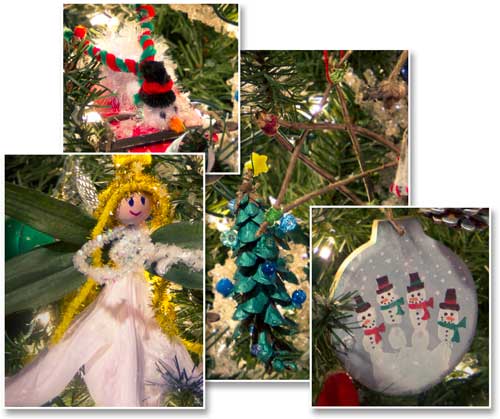
(Some of these are adaptations of similar projects we found online or on Pinterest; an image search should provide more photo examples if you’re looking for additional inspiration.)
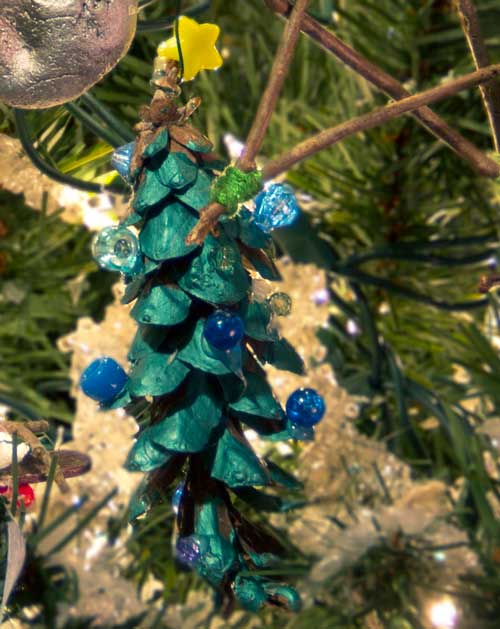
Pinecone Trees
Supplies:
- Pinecones
- Paint (tempera, acrylic, glitter glue, etc.)
- Wire, ornament hook or ribbon
- Craft glue or hot glue gun
- Optional: craft supplies like beads, pipe cleaners, sticker gems, etc.
These are pretty easy to make and look so pretty when they’re done. Just gather, find or purchase clean pine cones with sturdy blades, then let the kids paint them with a brush, or roll them around in paint. Let the paint dry, turn the pinecone upside down (to resemble a tree) then add “ornaments,” and some sort of star at the stem, if you’d like. Add an ornament hook or loop of ribbon to hang, and you’re done!
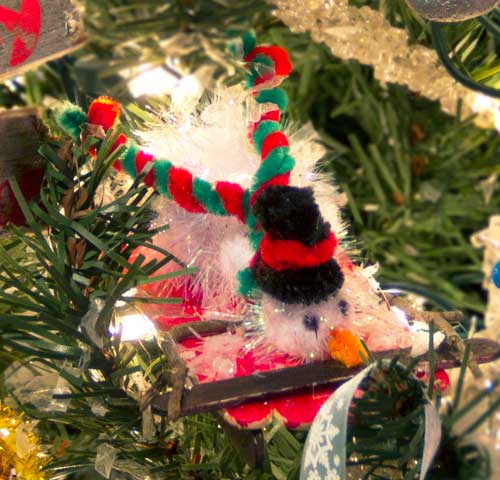
Snowman on a Sled
Supplies:
- 3 white or sparkly white pom-poms in 3 sizes
- 8 popsicle sticks
- Chenille stems (1 each of black, one red, one green, and one orange)
- 2 twigs
- Holly décor (if you wish)
- Craft glue
Paint or color 5 popsicle sticks red and glue them together side by side. Paint or color the other popsicle sticks black; glue two underneath the sled as runners. (You can find pictures of making a similar sled here.) Cut the other popsicle stick in half and glue it on top of the sled as a handle. Arrange your twigs into arms and glue them on top of the sled so they look like they are holding the handle.
Cut a small piece of orange chenille stem and stick it into the smallest pom-pom as a carrot nose. Trim a small amount of the red chenille stem for a band around your hat and trim the green to match, so they are the same length. Twist the red and green stems together for a colorful holiday scarf. Fashion a hat out of the black pip cleaner by twisting it around itself, twisting more around the base to make a wider brim, and add the piece of red stem for a colorful band above the brim.
Glue the pom-poms onto the sled, starting with the middle one in relation to the twig arms. Loop your scarf around and glue it in between the middle and top pom-pom. Glue the top pom-pom and glue the scarf to the top of the head. Add the biggest pom-pom on the end of the sled, and attach little holly pieces to the sled, if you wish. Use a permanent black marker to draw in some little coal eyes and you’re finished!
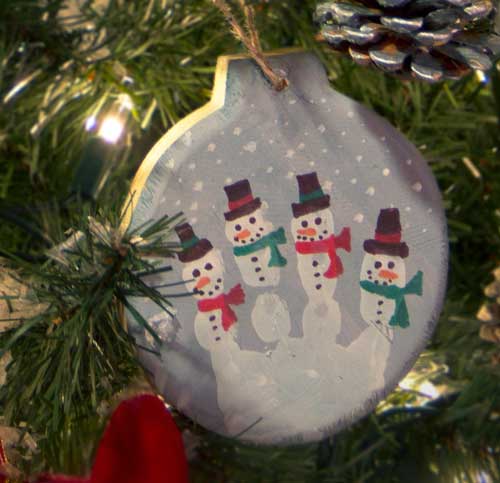
Handprint Snowman
Supplies:
- Plain wooden circular ornament
- Gray/Blue paint
- Washable non-toxic white paint
- Sharpie or other permanent markers
Paint the ornament with a light grayish blue color for a cold wintry sky. Allow to dry. Paint your child’s hand with white paint (4 fingers and the top half of their palm). Press their hand onto the ornament – their hand should form some snow at the bottom and four little snowmen. Dab little dots of white paint around the rest of the ornament for snow falling. When the paint is dry, draw on little hats, faces, scarves and buttons.
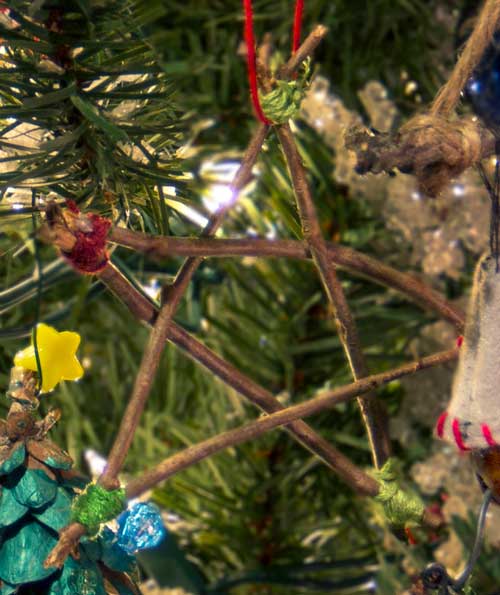
Twig Star
Supplies:
- 5 small twigs (all about the same length)
- Embroidery floss in different holiday colors
Arrange your twigs in a star shape, with twigs going over and under the other twigs. Tie each corner together by winding embroidery floss around and between the two sticks. Add another piece of embroidery floss as a hanger.
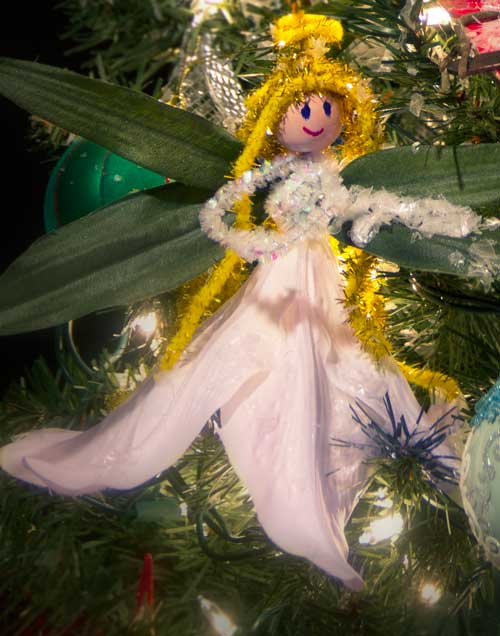
Lily Angel
Supplies:
- White fabric lily with wire stem, leaves
- Large wooden bead
- 2 sparkly white chenille stems
- Gold wireless chenille
- Permanent markers
- Craft glue
Pull plastic casing off of stem, detach leaves, so you are left with the lily on the wire. Arrange two leaves together on each side for wings and twist wires together. Arrange wings on top of the upside down lily and use one of your sparkly white chenille stems to wrap around leaves and lily stem as the top of the dress and to hold everything together. Wrap the second chenille stem around also, leaving long enough ends to bring to the front and bend into praying hands.
Draw a face on the wooden bead and then thread it on the lily wire. Glue wireless chenille on the bead for hair. Trim the wire about 2 inches above the top of the bead and bend the end into a hook. Use some of the gold chenille to fashion a little halo and attach to the wire above the angels head, if you wish.


